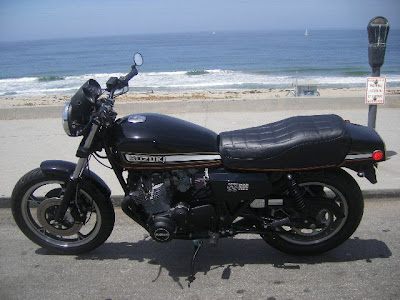
If you've been reading the blog for a while you might remember that I bought a mate to my first GS1000 (check out the post here). After getting it home, getting it running and scrounging up all of its missing parts, I realized that I didn't have the time, energy or money for another bike project. So I passed it on to my friend Dan in Redondo Beach.
Dan got hard to work and built a neat mild custom out of it over the past few months. He used some really cool parts, like a Yoshimura exhaust and some mini turn signals that I gave him. The finished bike is way tougher looking than the bruiser. I like the black case covers, myself. They contrast well with the stock paintjob.
It definitely makes me miss The Bruiser - I found myself cruising Craigslist for another one just today.
Tuesday, May 20, 2008
Monday, May 12, 2008
Goodby Bruiser
Well, after a short seven months of ownership the GS1000 is gone to a new home in Las Vegas.
I really liked the bike but never completely "clicked" with it...
So when someone emailed me with an offer I couldn't refuse I jumped at it.
Hopefully the new owner will send me some pictures to put up on the site.
The bike I really want is still out there - a 1986 GSXR 750 with original blue & white paint. Let me know if you have one.
Stay tuned, I'll post a link to my next project.
In the meantime, I'll leave this blog up for others who want to restore an old tank like my GS.
Sunday, May 4, 2008
Jet Kit and Pod Filters
I've been riding the bike around with the aftermarket exhaust and opened stock airbox, but I always felt like it rode a little "flat". I know that 4:1 pipes do weird things to intake resonances and can cause holes in the rev range with an untuned airbox. Since each carb is connected together, a reverse wave through one can disturb the other three - this will richen or lean the mixture depending on which cylinder is next in the firing order and what rpm.
On newer bikes everything is optimized to run perfectly together and the stock airbox is sized and divided to eliminate this effect and push the torque curve up in certain areas. Starting in the mid-1980s and after, removing an airbox usually reduces horsepower and torque all over the place, with only minimal high-rpm power gains. Same thing can happen when you modify the exhaust header of one of these bikes.
Lucky for me, 1970s Suzuki engineers weren't nearly so precise. The stock GS1000 airbox is semi-restrictive, and probably only helps torque in a very narrow range of engine speeds, if at all. I've seen dyno graphs of these engines, and properly jetted there is almost always power gains above 2000 rpm when the airbox is ditched. By 6000-7000 rpm there's a huge (relative) power increase with no airbox - maybe 4 horsepower, which on a 80 horsepower motor is 5%.
So I started searching for some quality pods - the K&N ones are the best, and lucky for me a found a set for a reasonable price. The cheap knock-offs are more restrictive, and they don't have the nice radiused inlet the K&Ns have.
I could have jetted the bike myself for the pods, but the biggest change would have to be in the mid-range, which is determined by the needle. Needles are a serious pain to change out, but the stock needle would be difficult to make work with the pods. Some guys recommend restricting the air bleed passage to the main jet, but that just seems wrong to me (since it would have a greater effect at high speeds, meaning you'd need a larger main jet).
So in the end I just paid for a dynojet kit. A lot of guys on the GS Resources have this kit, and setting it up has been well documented. It's a little more expensive than swapping jets and needles yourself, but if you have to try two or three needles to get it right then you will spend as much as the DJ kit.
I dropped it in one afternoon, using the DJ 138 jets and the DJ needle with the clip in the 4th position from the top. I left the pilot fuel screws alone because the DJ kit didn't really mess with the low-speed circuits, and the stock airbox isn't much of a restriction at idle and cruise rpm.
Once running the pilot air screws required only a tiny adjustment to get it idling nice. A few quick runs down the street and plug chops showed that everything looked pretty good. My impression so far is that for such a small change this really helps the motor. The bike was fast before, but now it really flies, especially at high rpm. No more flat spots that showed up when I added the pipe, just a good strong pull from 3000 to redline. I'll have to start working my biceps to hold on better!
I don't plan to do much more to the bike. I have it running and handling amazingly. It would be nice to swap to better shocks but that would require spending more money on it, and the ones on there now are OK. My friend Dan is working on a brake conversion that uses late-model Kawasaki calipers on the stock rotors, which sounds promising. The stock brakes are pretty good but rather wooden and there isn't much feel. I may look into his brackets when they're done, but it won't be soon. For now I'm content to just enjoy the good weather and get some miles under it.
Sunday, April 20, 2008
Battery Box Refurb
The bike's been running great so that means it's time to go back and re-do a few minor details that didn't get finished to my satisfaction the first time around. I'm a bit of a perfectionist so I like to make sure everything's done just right.
One of those things was the battery box. It's kind of buried in the center of the bike so I didn't mess with it when I was working on the electrical system. It was pretty rusty, though, and I was worried that the sheet metal would crack and dump my battery out onto the swingarm.
I also wanted an excuse to get one of those non-vented AGM batteries they have now, so I sold the old battery to my friend Dan and ripped out the box.
It was rusty but not all the way through - A quick soak in my favorite Phosphoric Acid solution removed the rust and left it ready for sanding and paint. My preferred rustoleum hard-hat did it's usual good job, and I threw it in the oven for an hour at 175 degrees to get it rock hard.
Back in the bike no-one can see it, but I know it's there.
Monday, April 14, 2008
Jetting
So not much to report - I've put a few miles on the bike and been playing with the jetting some more. The main jet I installed at first - 117.5 - seems a bit fat, actually, but the midrange is kinda lean.
I don't want to spend much time with it because I plan to either install K&N "pod" filters or swap a set of VM29 smoothbores onto the motor. Either approach will require some serious jet swapping, so I don't plan to spend a lot of time on this interim setup. I managed to brown the ends of the header pipes while I was tweaking the mixture screws, of course, but most of the color polished out. I've heard it's an inevitable process with aftermarket pipes.
In the meantime, I was annoyed by the top end rattle that I hoped was an exhaust leak. It wasn't. I pulled the valve cover off yet again and measured all of the clearances - I swapped around the shims some more to get them all on the tight side. The clatter seems to have gone away, but I have yet to ride the bike any distance. Hopefully the noise was just a sloppy valve adjustment on my part.
If not, I'm not sure the valve cover gasket will survive another removal, but we'll see, won't we?
Monday, March 31, 2008
Exhaust Time
From the first day I dragged this bike home I dreamed of having an aftermarket exhaust. I just love the way a '70s bike looks with a 4:1 header and megga. While I had hopes of finding a vintage Bassani or Yoshimura pipe, I wasn't able to find a good one for a reasonable price. The occasional Kerker came up, but usually the cheaper one - not the performance-oriented "K-line" header.
Jardine recently stopped making their exhaust, leaving Mac and Vance & Hines the only existing manufacturers of exhausts for the old Suzuki. Mac leaves a lot to be desired in finish and overall quality, so V&H it was for me. Free shipping and a serious discount didn't hurt.
The pipe went on easy and fit well - I used more fancy stainless hardware with plenty of anti-seize. It took about 50 pounds of real weight off the bike, but about 1000 pounds of visual weight. Of course since I didn't buy new exhaust gaskets it leaked a little around one of the flanges - nothing another $10 won't solve.
With new gaskets, it ran great and sounded really good. The stock exhaust was pathetically silent. I screwed the fuel screws out 1/2 a turn (to 1 1/2 out) and the air screws out 1/2 turn to get the idle back into range. It was a little lean at first so I went with V&H's recommendations, replaced the jets with 117.5s and pulled the lid off the airbox. It seems OK, maybe a little lean still but it's hard to tell. I don't plan to spend much time getting the jetting tuned in since it's easier to just get pod filters and a Dynojet kit. Or get some VM29 smoothbores.
Wednesday, March 19, 2008
A Racing GS Sighting
This weekend I went to a benefit show/party for the Cretins M.C. here in LA. It was a good time, the beer & barbeque were flowing and the bands were loud. Some cool bikes there, including my friend Rick's CB450 vintage racer that's really close to being done. Check out the pictures at my Picasa site here.
Anyway, this one really caught my attention - it's a GS1000E vintage race bike called "The Ratzuki" by it's owner, Scott Fabbro.
The patina is intentional - he was tired of the attitude of the vintage racing establishment and wanted to prove a point with a bike that was really, really stock and really, really fast. Apparently they didn't take kindly to his other bike, a GS750 with a GS1000 motor and 17-inch wheels. While the 750 was a true vintage race bike with history, the vintage racers didn't like that it was so modified.
The Ratzuki has Lester 18-inch mags to run better tires (and because the stockers are heavy as anchors), drilled brake rotors, a Yoshimura pipe (a RARE piece) and 29mm Mikuni smoothbores. Otherwise it's stock, as amazing as that sounds. It may look like a refugee from the barn, but it sure sounds great.
Subscribe to:
Posts (Atom)